Michael Schmitt Blog Blog posts from mschmitt.org https://mschmitt.org/feeds/blog.rss 2023-02-05T23:43:27Z Convert a 5K iMac into an External Display tag:https://mschmitt.org/blog/,2021:convert-5k-27-imac-external-display-usb-c 2023-02-05T23:43:27Z 2023-02-05T23:43:27Z https://mschmitt.org/blog/convert-5k-27-imac-external-display-usb-c I recently upgraded from a 2015 27" 5K iMac to an M1 14" MacBook Pro and had planned on trading in my iMac with the purchase. I was, however, surprised to find Apple thinks my iMac is worth $0. Sure the computer inside is getting sluggish and isn't supported with new software updates, but this 5K screen is comparable to a $1.6k Studio Display! Surely that's worth something? It is to me at least.

Not wanting to sell (and more annoyingly ship) the iMac myself, I opted instead to set out to convert my iMac to an external display. It looked like this was possible — if possibly foolish — by ripping out all of the computer equipment within the iMac and replacing it with a new display driver board with your choice of display cables routed out the back. Surprisingly, I managed to successfully convert my iMac into an external display following this process and you can too!

To do so, you're going to need some extra hardware (and some guts).

Prep

Definitely check out Luke Miani's video walking through this process to see what's involved. I'll note I didn't quite score the same deal he did on the display board; I wound up paying around $300 for mine.

If you're still in, here's what you'll need:

The R1811 board supports DisplayPort, HDMI, and USB-C connections. The latter was tempting, however I came across one or two people in MacRumors forums claiming the USB-C connection had fried a port on their laptop so I opted to primarily use a USB-C to DisplayPort cable. I also ran an HDMI cable through just for flexibility in the future.

Disassembly

Obviously get all your important data off your iMac before beginning and bid it a fond farewell. After this the computer portion will be nothing but a pile of boards and speakers on your work table.

Also if you can, unplug your iMac and let it sit for hours if not days to ensure the power supply's capacitors are discharged. Holding the power button for ten seconds should accomplish this as well. You should still be very careful not to touch them while working, as iFixIt's guides warn many times, but knowing mine had been unplugged for nearly a week let me breathe a little easier.

Not surprisingly iFixIt's tear down guides are invaluable here. They'll walk you through carefully slicing through the adhesive holding the glass display to your iMac and removing the display. From there the innards are exposed for you to remove each piece.

Lovely, 6 years of dust.

I went roughly counterclockwise, starting with the left speaker, then power supply, right speaker, and logic board. If you have an SSD, be sure to remove it from the rear of the logic board as you may be able to repurpose into a handy external drive. Same goes for the RAM if you have a use for those sticks.

At this point you'll have a mostly empty body shell of an iMac and the separated display.

Connecting the New Board

The iMac display should have two wires still left attached: (1) the display data cable and (2) the backlight cable. These are what you'll attach to the new display board.

For the first, my board came with a new display data cable which completely replaced what was attached to the iMac display. For the backlight, my board came with an adapter which connected with the iMac's cable and routed to two separate connections on the new board.
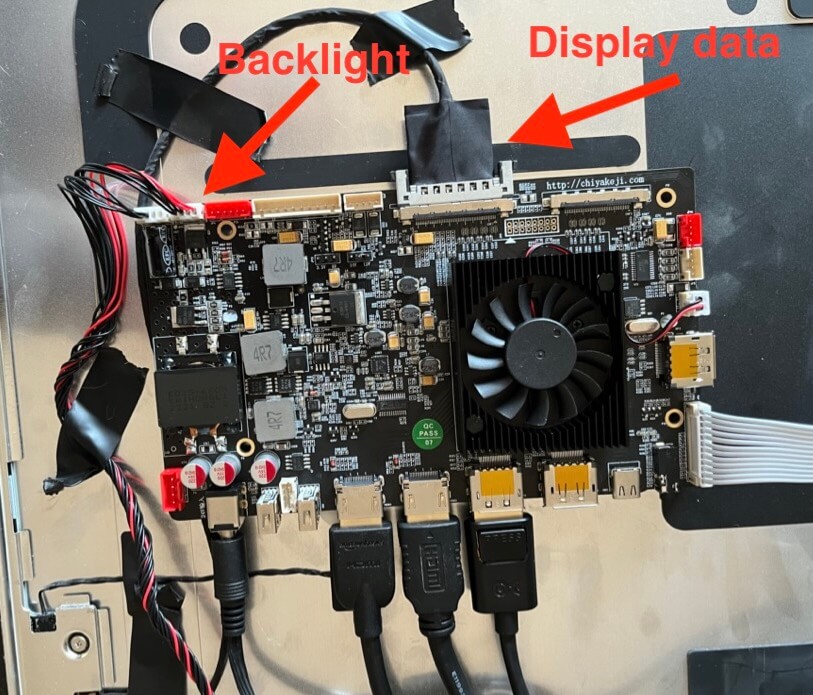
My display board after everything was hooked up.

I was able to connect these to the display while it rested face up on a table, plug in the board to a power supply, and test it out connected to my laptop. It worked! Felt like a Surface Table demo.

Maybe I could just call this done? Feels futuristic.
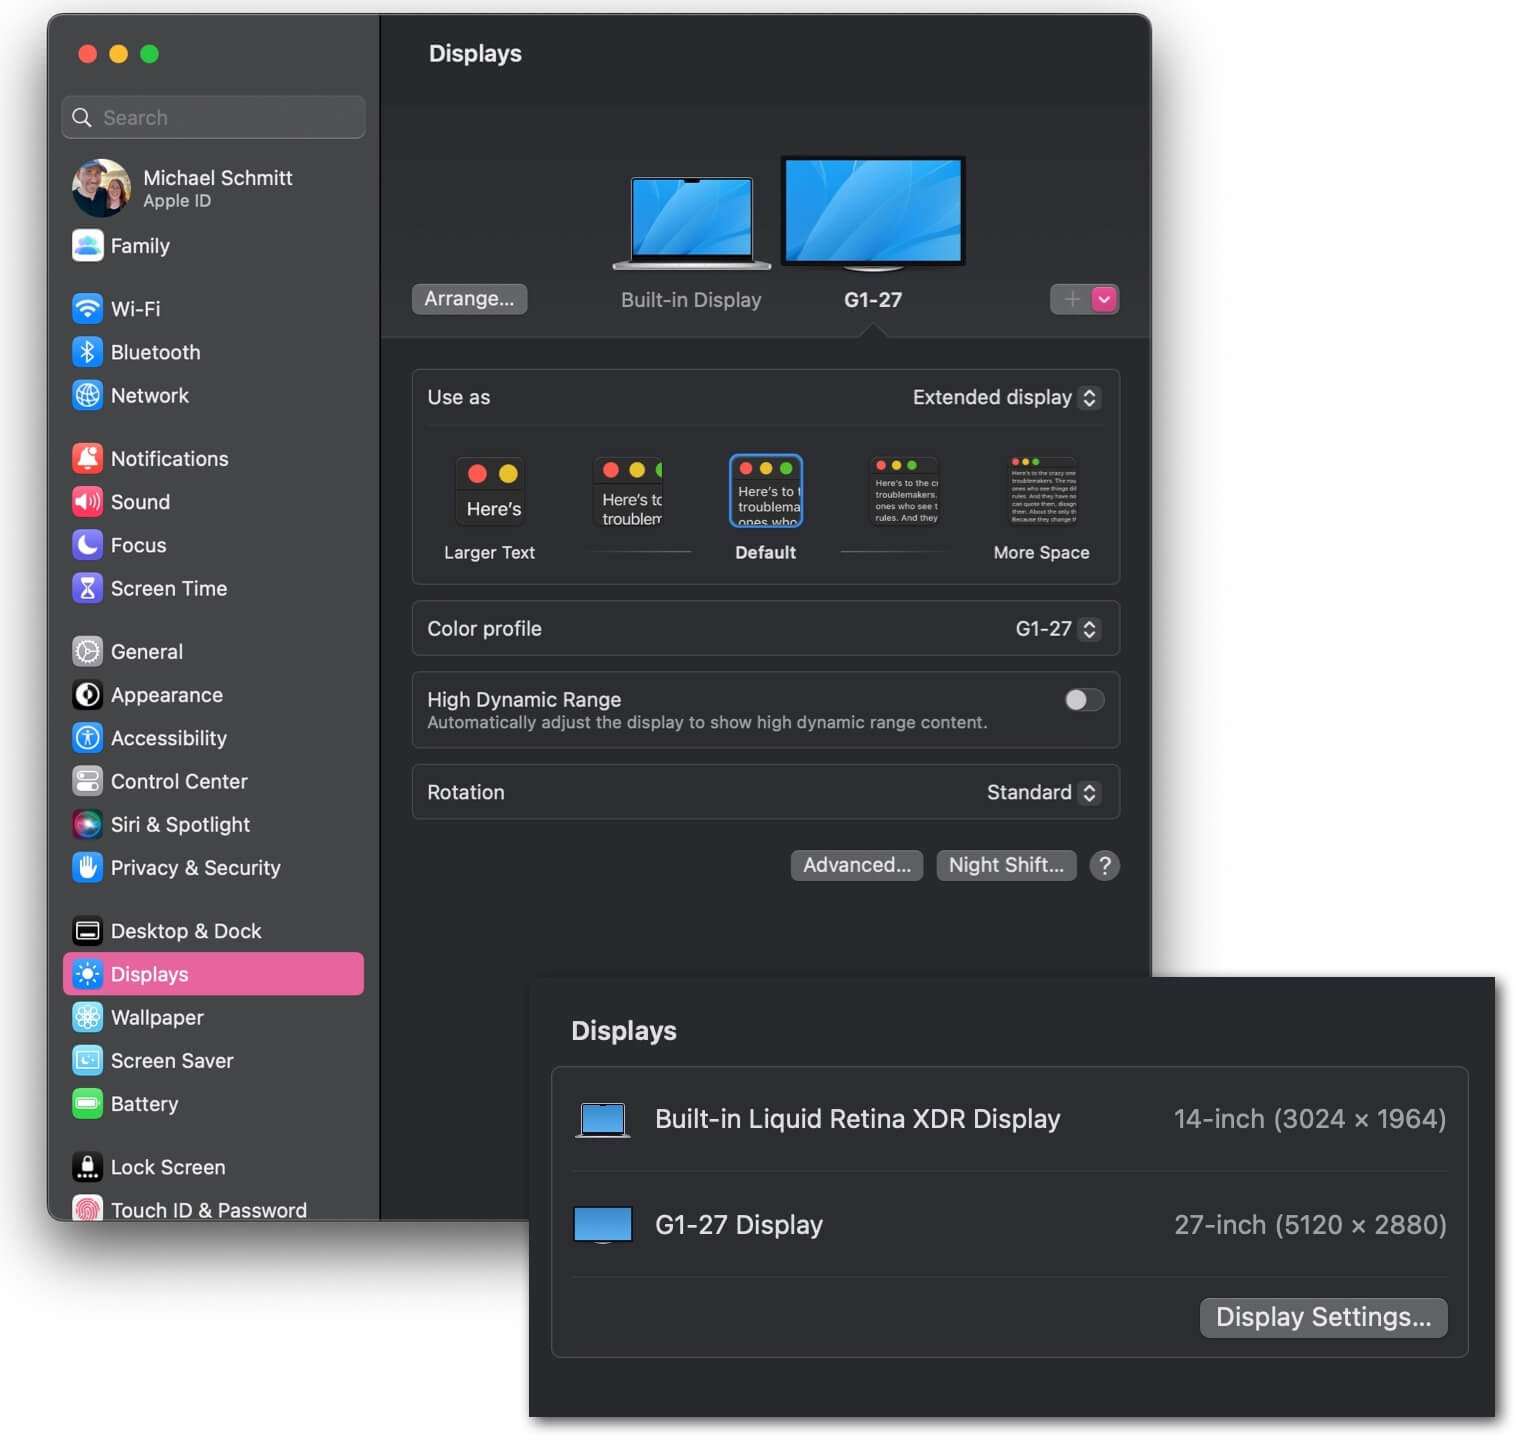
How the new iMac external display appears in my MacBook's display settings.

My board also came with a strip of buttons which turned out to control the display settings, such as switching between inputs. The menu was initially in Chinese but I was able to stumble through to find the language toggle with help from my iPhone's text detection and translation options.

Reassembly

Once I confirmed the board was working as expected with all my cables, I attached the board to the rear of the display with double-sided tape where it would rest on the left side of the iMac. That seemed to be the roomiest spot in the empty body and meant the cables would be close to the RAM access hole.

The rear of my iMac display with new board. Note I ended up flipping the new board around so the display ports pointed towards the center of the screen and RAM port.

I then carefully put the display back in place, routing the display cables and power cable out the RAM access port and checking to ensure their lengths would be acceptable for connecting various devices. I held the display glass onto the body with painter's tape and tested connecting to my laptop again to ensure nothing had come loose.

I'd recommend stopping at this point for a break if not overnight for two reasons. First, removing the display's adhesive and adding the new adhesive strips took me about 2 hours and I really appreciated not attempting it after several hours of disassembly and testing. Second, you'll want to really think through if you need to get access to that board for any other connections, longer cables, anything at all. You do not want to have to go through the process of slicing through the new adhesive just days later.

Again, iFixIt has a thorough guide on how to apply their adhesive strips which I'd strongly recommend. Here's where the tweezers will pay off! Applying the adhesive was more complex than I was expecting, though at least you don't have to take as much care with steps like avoiding the microphone hole (no more microphone!).

Conclusions

And that's it! I now have a gorgeous 5K 27" external display for my laptop. Both my MacBook Pro and my wife's M1 MacBook Air can drive the display at its full 5K resolution. All told it took me about a weekend from start to finish.

This whole idea definitely has some drawbacks: the rear is uglier than before with lots of cables coming through that large RAM hole, there's a new large power brick that makes transport tricky, not to mention the $300 investment into a computer Apple thinks isn't worth a cent. Plus it still has that iMac chin you could avoid with the new Studio Display.

Definitely a step down in the looks department from some angles

But if you enjoy the look of your old 5K iMac it feels like a great way to get more life out of it and not waste that beautiful display.

The entire episode drove home to me the downsides of the all-in-one computer design. Since I purchased this computer in 2016, Apple has jumped lightyears ahead in terms of computing power and features with their new M1 and now M2 silicon. But their display options, minus a few exceptions, are practically the same. The split leaves Intel iMac users in an odd spot: a computer approaching the end of its life welded to a practically new display. I'm glad Apple has offered new powerful, screen-less desktop options in the M2 Mini and Mac Studio so I can avoid being in such a tough spot in the future.

For now, I'll enjoy getting hopefully a few more years' life out of a display I loved.

]]>
Save Your Twitter Likes Without Using the API tag:https://mschmitt.org/blog/,2021:save-liked-tweets-without-twitter-api 2023-02-05T14:56:57Z 2023-02-05T14:56:57Z https://mschmitt.org/blog/save-liked-tweets-without-twitter-api As of February 2023, Twitter's free API is becoming a paid-only API. But the great thing about complex web applications like Twitter is there's always another API you can use: the one your web browser uses every day just to load data within the Twitter website.

Using the API Twitter itself uses may be a bit more cumbersome — no documentation, authentication is hacky, and really only useful for operations with accounts you own — but importantly it's still there, free, and quite powerful.

As one example, I was alarmed to find that between accounts being deleted and the crumbling of Twitter itself a lot of my liked tweets from over the past 10 or so years were disappearing. So I took a look at the API calls Twitter.com makes to load my liked tweets and built a hacky Python script to download them all.

From there, the data is yours to store and use however you'd please. I went a next step and output the tweets as HTML for easier browsing, and to easily host the best tweets for easier sharing. All this is now stored completely separate from Twitter!

Instructions on how to get started are in the code's README but the trickiest part is finding your authentication details. For that, you need to:

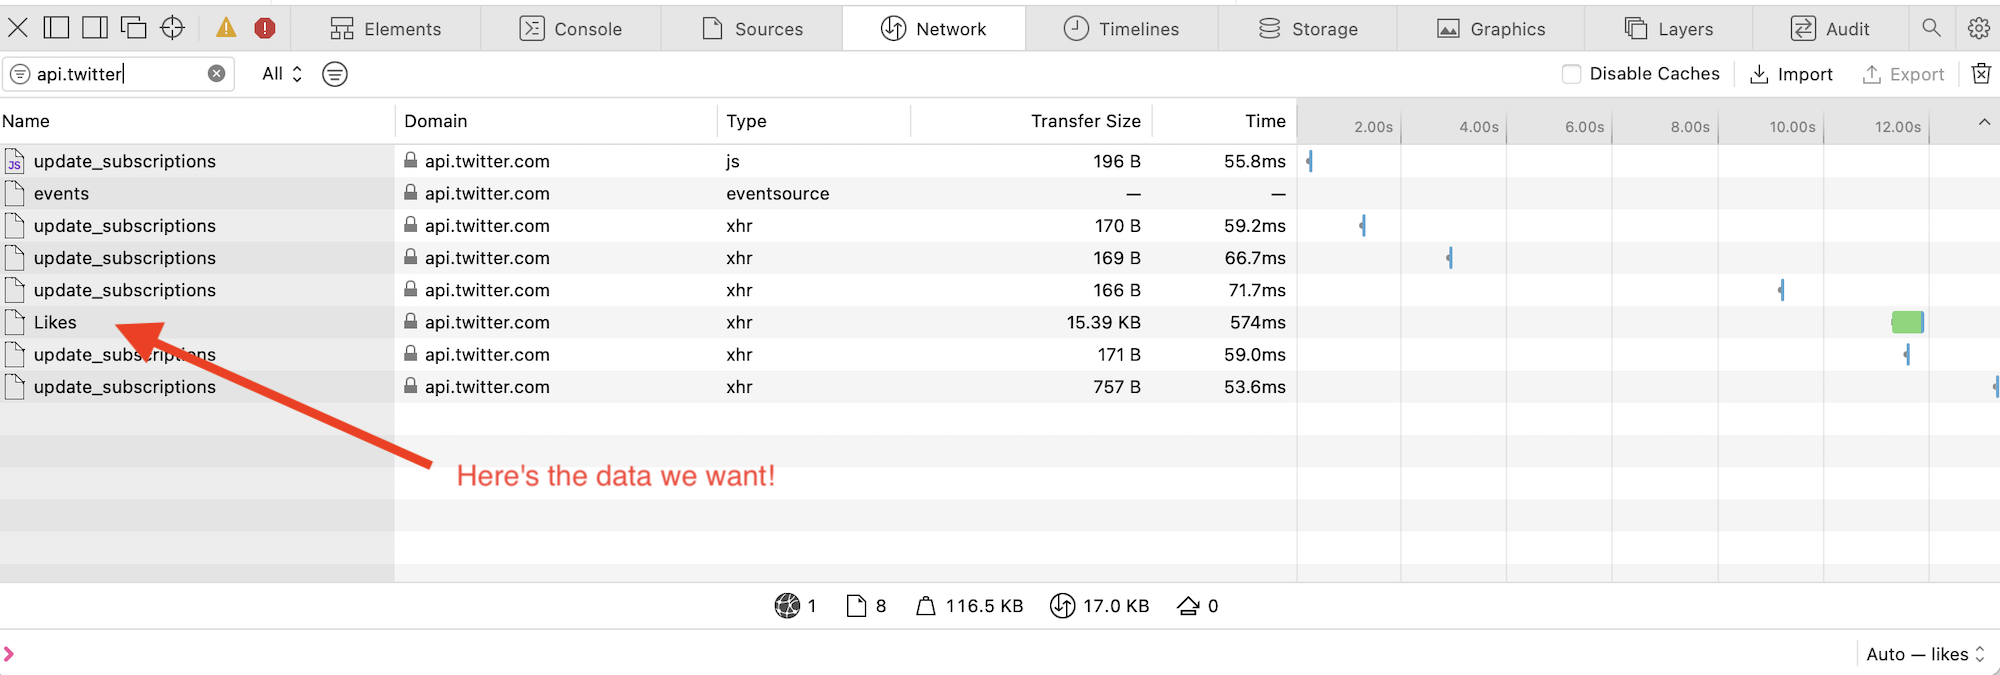
  1. Open up the Network debug console of your web browser and then head to your liked tweets page on Twitter.
  2. Filter for a request to the 'api.twitter.com' domain, with a path ending in '/Likes' -- this is the request the script uses to page through and find all your likes!
  3. Find the request headers for this API request. You'll need the following values: Authorization, Cookies, and x-csrf-token.
  4. Add those values to the script's 'config.json' file and you should be ready to roll!

This manual copy-and-paste sleuthing lets you side step Twitter's authentication and just let the script operate as if it were your web browser loading page after page of liked tweets. And it shows you exactly how to expand this starter project into other areas of Twitter: find the requests your web browser makes and replicate them!

It may not be as good as a robust third party API but it's much better than paying a greedy fool.

]]>
Book Report: "The War of the Poor" by Éric Vuillard tag:https://mschmitt.org/blog/,2021:book-report-war-of-the-poor-eric-vuillard 2021-06-27T17:32:19Z 2021-06-27T17:32:19Z https://mschmitt.org/blog/book-report-war-of-the-poor-eric-vuillard A quick and emotional read, sprinting through the anger and violence of several class uprisings from the 14th to 16th centuries in Europe. Vuillard injects enough commentary to tie the events to the present day. Since reading the book, I've seen the author's works described as "historical essay with literary flourishes" which applies here as well.

The book is more concerned with conveying the feeling of being there, of understanding why people took the actions they did -- especially those who didn't live to tell their side or were coerced into supporting the ruling classes -- than on exhaustively providing a dry litany of events. As a result, it's memorable and thought-provoking. One of those books that will take a few hours to read but may spark many more hours of thought, or even several months of obsessive reading on the events described.

I can't find the exact link -- likely was an ephemeral IG story -- but I'm 99% sure I was pointed to The War of the Poor by a post from Evan Dahm. I'd honestly recommend reading and buying Dahm's work before this book.

A couple themes and patterns that jumped out to me:

Advances in communication technology sparking change

The invention of the printing press and subsequent distribution of The Bible is cited as a root cause of future upheaval. Information and knowledge, previously expensive and slow to spread, is quickly distributed to a larger population. The secondary effects of this jump forward are not easily predicted and become mixed with pre-existing problems.

In this situation, dissatisfaction among serfs and lower classes was suddenly injected with holy knowledge. Not only was this knowledge ripped out of the hands of the ruling class, but directly condemned them.

Religion as catalyst for extremists and violence

"Leave everything and follow me," Jesus said, and yet here are these priests, bishops, popes living in palaces. "They began to realize they'd been lied to," writes Vuillard. "They had a hard time understanding why God, the God of beggars, crucified between two thieves, needed such pomp. Why his ministers needed luxury of such embarrassing proportions. Why the God of the poor was so strangely on the side of the rich."

The very material and worldly complaints of the ruled -- taxes too high, freedom of movement restricted -- become inflamed to violent extremes when injected with religious righteousness. "God has given power to the common people," wrote firebrand Thomas Muntzer to a Count. "The eternal living God has commanded that you be cast down from your throne by the power given to us; for you are of no use to Christianity."

The violence employed in the name of religion becomes a good, necessary solution to the ruling class, in the same way it applies to witches and heathens. "[Munzter] denies that anything can be changed amicably... no, that won't do, one needs trial by fire.... Godless rulers should be killed."

The state choosing violence again and again

The several uprisings detailed in the book begin with individual, personal acts of violence enacted by the state's representative. This sparks escalating reprisals, uprisings, mass destruction of property, and bloodshed against state representatives.

Critically, in each uprising there is a moment when the King, the Count, the Magistrate -- whoever stands as the final physical manifestation of The State itself -- finally turns their attention to the unrest and is forced to reduce themselves to the people's level. Negotiations occur, the violence pauses, and demands are put forth. At this point the people still retain their hope and faith in the state. Surely the King will hear us, they say, and help. "We always want to believe what the father says."

It is crucially the state which explicitly chooses in these situations, again and again, to weaponize this desire for a peaceful resolution. They use negotiations as "a means of combat" -- to delay, marshal their forces, draw out the ring-leaders and finally execute further mass violence against the people. Rather thousands slaughtered than one ounce of power be yielded.

"For the powerful never give up anything, not bread and not freedom."

]]>
Extracting colors from images for pre-loading, iOS 15 Safari, and more tag:https://mschmitt.org/blog/,2021:extracting-colors-images-python 2021-06-19T15:14:06Z 2021-06-19T15:14:06Z https://mschmitt.org/blog/extracting-colors-images-python A constant challenge for image-rich applications, whether mobile apps or website, is what to display while images are loading. There's plenty of options, but one that grabbed my attention recently was BlurHash - a library that displays blurred representations of a image using a short string while hte larger asset is loading.

I really liked this idea, but wanted to find a way to replicate a similar experience in Serial Reader without depending on a library. Plus, because all the book images in Serial Reader are pretty much a single color, a much simpler strategy would likely be good enough.

After some experimentation, I landed on this approach:

  1. Open the original image
  2. Apply a ridiculous gaussian blur with a radius of 3x the image's width
  3. Get the color at the first pixel of the blurred image (bonus: convert this rgb value to a hex for easier web use)

Here's an example implementation of the above using Python and PIL:

  from io import BytesIO
  from PIL import Image, ImageFilter

  original_image = Image.open(image_filepath).convert("RGB")
  image_width = original_image.size[0]
  blurred_image = im1.filter(ImageFilter.GaussianBlur(radius = image_width * 3))
  buffered = BytesIO()
  blurred_image.save(buffered, format="PNG")
  r, g, b = blurred_image.getpixel((1, 1))

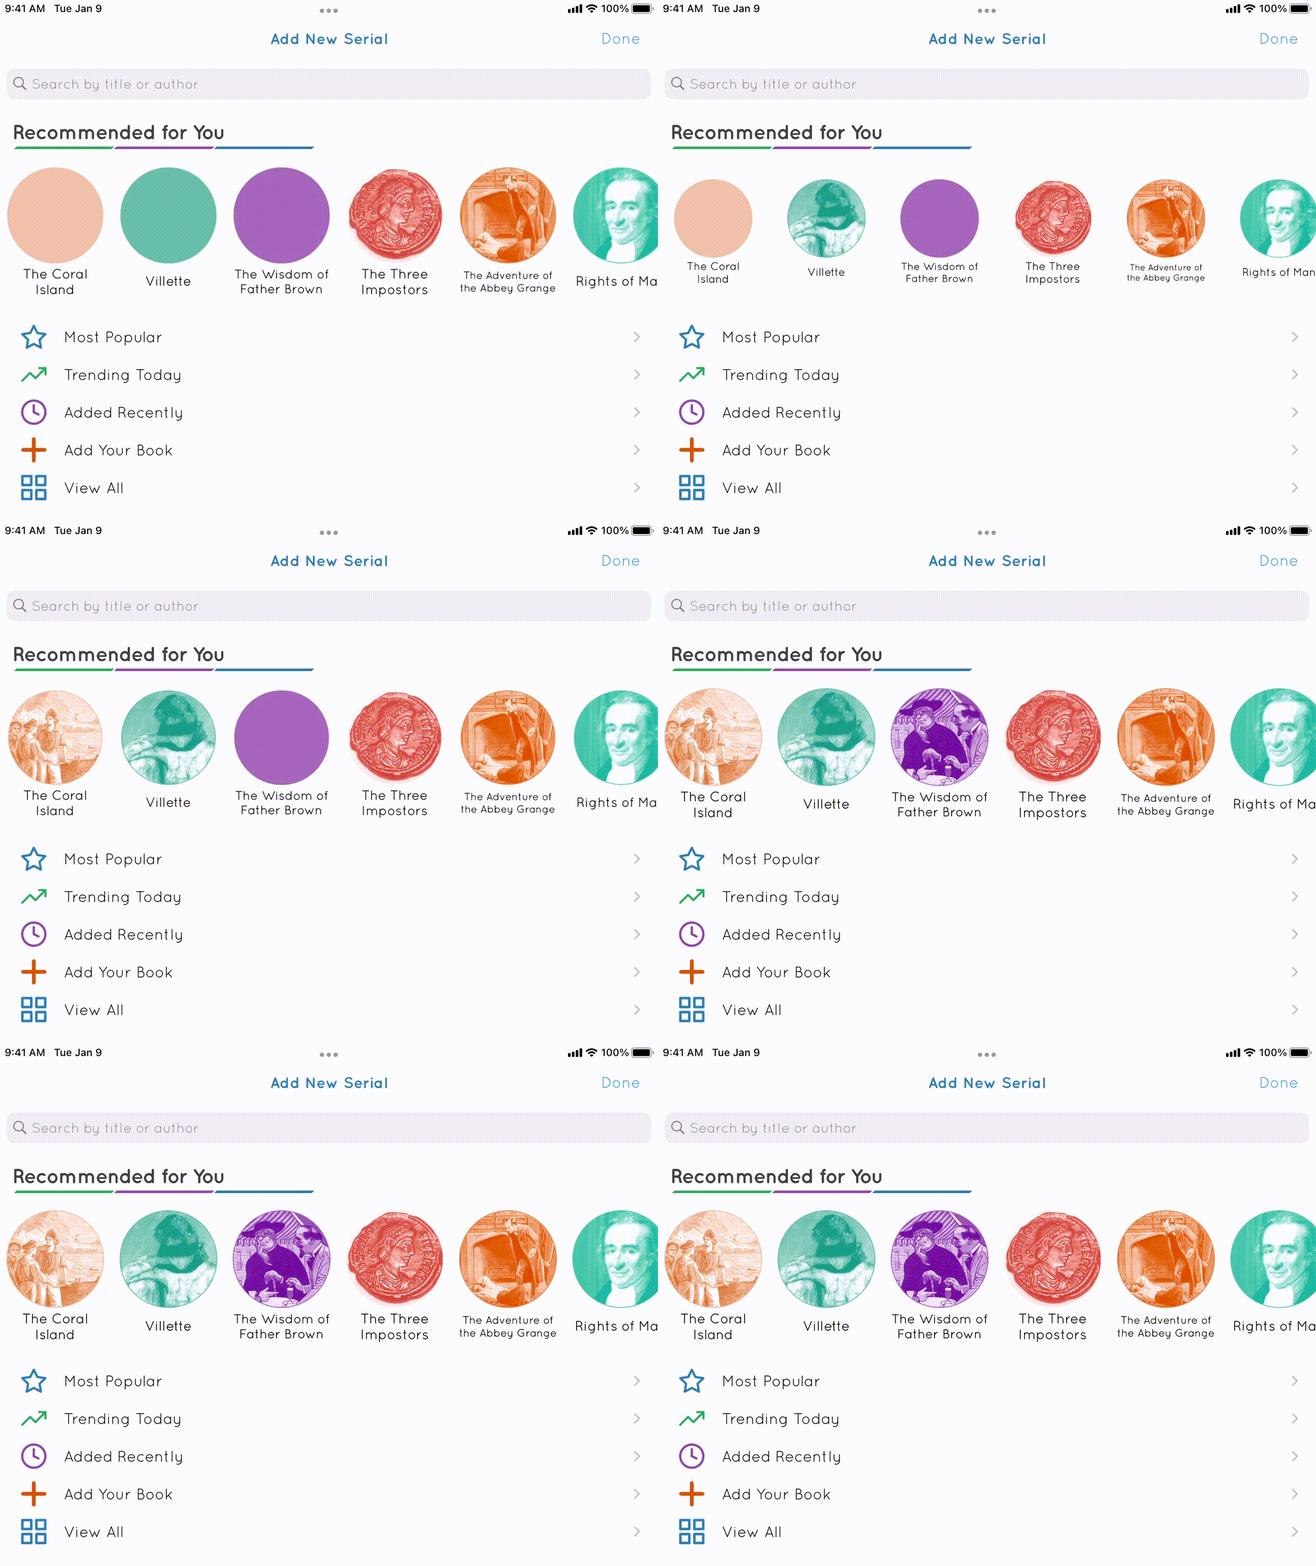
Essentially this flattens an image to its most basic color. I then save this color value as a hex string alongside other metadata for each book so it can be easily provided and used as a placeholder while the book image itself loads.

In Serial Reader's iOS and Android apps, I can use this hex color as the background color for each image which is overwritten by the real image when it loads. It results in a nice morph effect that isn't too distracting but a step beyond whitespace or a loading animation.


iOS 15 Safari

Now that I have this handy color value, dynamically generated per book image, there are some other fun things I can do. For example, I can set the image border to this color even after the image has loaded for a subtle pop. I can also lean on these colors to customize the feel of Safari in iOS 15.

Each book in Serial Reader has its own dedicated page on the website, so for each I can pass through the hex color value as a meta "theme-color" value.

 <meta name="theme-color" content="#{{ book.image_color }}">

In iOS 15, Safari then updates its UI to match each book's image.


]]>
Migrating a MongoBD replica set to a new hosting provider with no downtime tag:https://mschmitt.org/blog/,2021:mongodb-migration-replicaset 2019-07-14T14:47:41Z 2019-07-14T14:47:41Z https://mschmitt.org/blog/mongodb-migration-replicaset In running my projects, I've moved hosting providers 4 times now and experienced no downtime. I don't think this is super remarkable but thought I'd share how I do it in case anyone is facing move #1 and feeling anxious.

Prerequisites

First off, as the title suggests this is focused on moving a MongoDB replica set between providers. This approach would also be handy if you're moving between geo regions within the same company.

If you're not running your MongoDB setup in a replica set, MongoDB has a good tutorial on getting started. Spinning up a replica set is a great idea to add some peace of mind (if not some performance benefits if secondary reads are your jam) as it adds redudancy to your architecture and makes tasks like migrating to a new provider super easy.

I usually run my replicasets in the same datacenter, so all mongod instances are only open on their private IPs. Part of this transition involves opening those up to their public IPs temporarily which is definitely less secure. I'd recommend enabling access control in your database, using a key file, and taking a look at MongoDB's security checklist before proceeding. (These are all good protections to keep in place after the move too!)

We'll be throwing your entire database across the network to your new provider, so this approach won't work well if your database is large and will blow through your existing inbound/outbound bandwidth limits!

The general idea here is to add a new replica set member in your new provider, get it up to sync, then slowly shut down your old servers. A database set of Theseus, as it were: same replica set and data in the end but completely different servers.

1. Boot up the new server

In your new provider location, boot up a new server that will run MongoDB for your new architecture. Get it ready to run Mongo and communicate with your existing database server(s):

  1. Install MongoDB
  2. Modify the Mongo conf file (/etc/mongod.conf for Linux machines) to...
  3. Use your existing replica set
  4. Use your security keyfile and other settins
  5. Bind to the new server's external IP address at the very least
  6. Upload your keyfile, if need be
  7. Update the device's hosts file, if need be, so it knows which external IPs to use to reach your currently running MongoDB servers
  8. This is usually /etc/hosts on Linux machines, and the structure is "IP_ADDRESS HOSTNAME"
  9. Ensure your target MongoDB port is open on the new server (27017 by default)

And then start up MongoDB on your new server. It'll try reaching out to your existing servers to become a part of the replia set but will likely be unable to connect.

2. Modify your existing servers

Head into your existing servers and make the following modifications:

  1. Modify the Mongo conf file to bind the server's external IP address
  2. Modify your device's hosts file, if need be, so it knows which external IPs to use to reach your new server

Then, starting with your secondary MongoDB instance, restart mongo to start using the new settings. Move to your primary MongoDB instance and make it step down to secondary (issue a rs.stepDown() command), then restart it as well. See how easy these things are when you have a replica set?

3. Add the new replica set member

At this point, the old servers and new server should be able to communicate with one another over the port your Mongo instance uses. All that's left is to add the new server to the replica set.

Open up a new mongo shell connection in your primary replica set member and issue the following command:

rs.add( { host: "new_host_name:27017", priority: 0, votes: 0 } )

Be sure to update the port number if you don't run on the default 27017. Note the priority and votes args: this is because the new member will immediately count as a normal secondary instance when it comes to voting for a new primary server "even though it cannot serve reads nor become primary because its data is not yet consistent." We'll update this later!

You should then be able to run rs.status() and see the new server listed. It may be in a "STARTUP2" state which is fine - as long as you don't see any connection errors we should be in business. You'll likely see a line showing which current mongod instance the new server is syncing from too.

4. And now we wait

At this point all your database is sending all data to the new server to get it up to speed with the other replica set members. Depending on how large your database is this will take minutes to hours - I usually let it chug along for a day or two to be safe.

The new server will remain in a "STARTUP2" state as long as its doing the initial data sync. It then moves to a "RECOVERING" state and finally to "SECONDARY" when the new member has "enough data to guarantee a consistent view of the data for client reads."

5. Final steps

Once the new server is in a "SECONDARY" state, you can update your replica set config to give the new member full voting rights and a normal priority. This new server will likely be a primary very soon after all!

MongoDB has a good tutorial on doing this, but essentially in the mongo shell you'll want to grab the current replica set config with rs.conf(), edit the target member's priority and votes values, then apply the modified config with rs.reconfig(cfg).

At this point your new server is a fully-functional member of your replica set. If you have a new web server or other client that will interact with your database within the new hosting provider, you should be able to connect to the new database server and read data as normal (this may be slow if your setup is configured to read only from primaries and the primary is still back in the old hosting provider).

Once you've confirmed everything is working as you would expect, you can make the new server the replia set primary by issuing rs.stepDown() commands in your existing primary until the new server is elected as the new primary. All existing connections to your database should continue working -- if a little slowly -- as its now piping database traffic between hosting providers.

If you're running a web server, you should now be able to update DNS entries or take whatever other steps to shift web traffic to your new hosting infastructure.

6. Remove old members

You now have things running completely in your new provider! As a bonus, your existing infastructure is keeping up to date with new database changes from the new infastructure so if anything goes wrong or needs to be rolled back, you can transition back to your old provider pretty quickly and without data loss.

I like to keep things running in this dual-provider setup (all traffic going to new provider, databases in old provider still running and keeping in sync) for a couple days at least just to be safe. Nothing worse than realizing you forgot a script or some important process or file on a server that was deleted too soon!

You should next spin up new replica set members in your new provider, mimicing your old replica set to ensure you'll have the same safe redudancy when you shut off the older instances.

Once your new replia set is ready and you're comfortable the new hosting setup is working as expected, you can remove the old servers from your replicaset by issuing this command from the new primary:

rs.remove("old_member_hostname:27017")

Checking rs.status() afterwards should confirm the old member is no longer part of the set. You can then safely stop and decomission the old server.

When all servers from the old hosting provider are removed from the replica set, it's a good idea to update your new servers' mongo conf files to bind only to private / internal IP addresses if possible.

Celebrate!

And that's about it! You've shifted your data and mongo infastructure over to your new provider without any down time and with data redudancy the whole time.

]]>
Salon spotlights Serial Reader tag:https://mschmitt.org/blog/,2021:salon-serial-reader 2019-06-04T17:46:40Z 2019-06-04T17:46:40Z https://mschmitt.org/blog/salon-serial-reader I was lucky enough to have Serial Reader noticed by Mary Elizabeth Williams, an author and staff writer at Salon, who gave me the chance to ramble a bit on the app and why I built it.

Be sure to check out the article and Mary Elizabeth's other writing on the site and elsewhere!

I enjoy looking to other apps that are trying to tackle the same big problem as Serial Reader - that is, breaking a "Big Task" into smaller pieces that are provided over longer time periods - for inspiration and ideas. Podcast and fitness apps are great examples, but hadn't thought about the meditation apps Mary Elizabeth references in her article. I'll have to take a dive into those!

]]>
Discover your favorite artists' new albums using Spotify's API tag:https://mschmitt.org/blog/,2021:followed-artists-new-album-releases-spotify-api 2019-04-07T18:42:10Z 2019-04-07T18:42:10Z https://mschmitt.org/blog/followed-artists-new-album-releases-spotify-api In most ways Spotify is great. In some specific ways, Spotify is baffingly bad. One of the most annoying shortcomings of the platform is the inability of Spotify to alert you to new album releases from your favorite artists, even if you've explicitly "followed" the artists in Spotify.

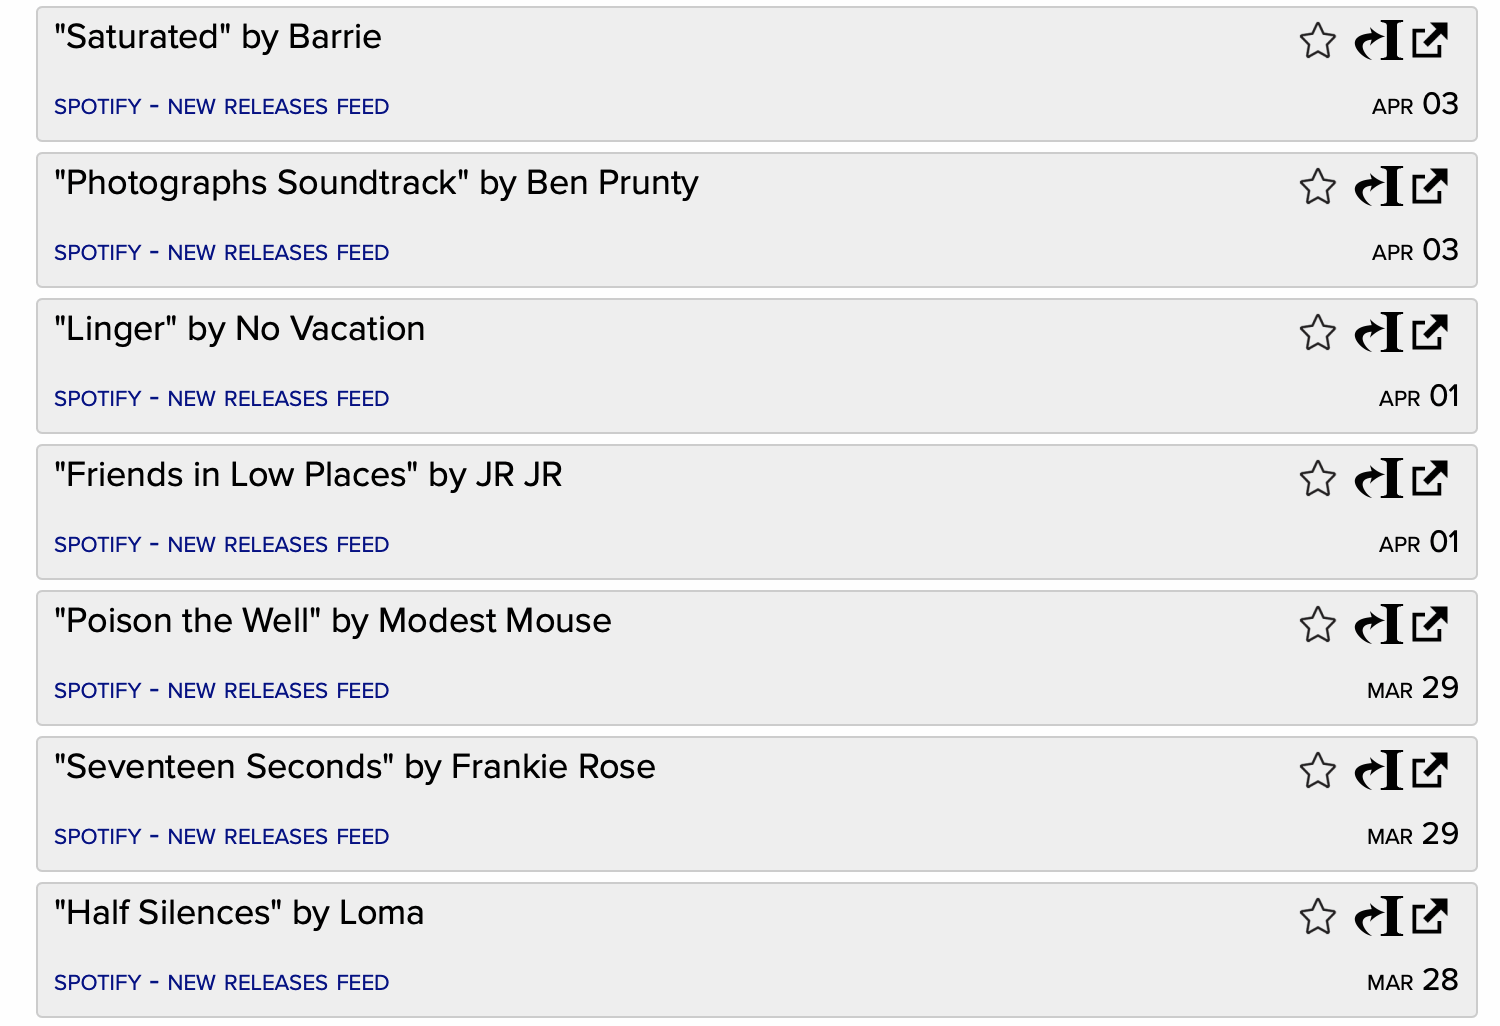
If you're frustrated by this lack of functionality, you can actually pretty easily fill the gap yourself using Spotify's JSON API. This weekend I used the following to build a quick RSS feed for myself that will update itself with new releases from my favorite artists.

To start, you'll need some Spotify API credentials and the tokens necessary to interact with your account. Spotify's documentation walks you through this process.

Once you're set up and can make API requests, set up a call to fetch your user account's list of followed artists. The response will include an "items" payload - the list of artist data - and a "cursors" object with an "after" key you can use to retrieve the next page of artists (note the max limit of artists is 50, so implementing paging is likely required).

Within the payload response for each artist is an "id" value. Use this value to fetch the list of albums by the artist. Note this endpoint requires a "country" param for cleaner results, as well as a "include_groups" param you should customize to releases you're interested in (I used "album" and "single").

The album list response data will include a "release_date" value (which appears to be "YYYY-MM-DD" format, though Spotify's documentation doesn't list this explicitly) to helpfully sort your results.

Note too that both the artist and album response payloads include a "external_urls" key. This is a hash with at least one entry with a key value of "spotify". The value is a Spotify URL that you can rely on to open into the Spotify app on a mobile device, should you want to quickly jump into the app to listen to the new release.

One issue I encountered when setting this up is Spotify's rate limiting is rather aggressive. You'll receive an error response with code 429 if you encounter this problem too. Spotify's documentation directs you to "check the Retry-After header, where you will see a number displayed. This is the number of seconds that you need to wait, before you try your request again."

Those two API calls are just about all you need to generate a list of albums, sorted by release date, from your followed artists on Spotify.

See also: Build Spotify playlists from radio station JSON feeds

]]>
Analytics of Delight tag:https://mschmitt.org/blog/,2021:analytics-of-delight 2018-06-08T21:36:45Z 2018-06-08T21:36:45Z https://mschmitt.org/blog/analytics-of-delight What motivates you to sustain side projects?

For me, the primary drive is probably the love of coding, of solving problems, of crafting something new. But sometimes (ok, often) I'm just tired. Inspiration is lacking. Work has me burned out on writing code. I can't stare at a screen for one more second. What then?

It'll come as no surprise that most developers' independent, early-morning/late-night/weekend apps don't make them rich. Serial Reader is no exception. It pays for itself and maybe a nice lunch, but that's about it.

Runaway growth would be another nice source of inspiration. Yet years into a side project, I'll bet any sexy hockey-stick growth has been replaced by steady, unexciting constant usage.

What then? What keeps you maintaining, improving, and expanding such a side project?

One answer that's increasingly inspiration to me is the analytics of delight. That is, capturing user behavior - preferably in a self-hosted, anonymized fashion (Matomo is great for this) - in a way that lets you zoom in on how one person is using your creation.

For example, I can see that someone in the vicinity of Moscow is about a quarter of the way through an Agatha Christie mystery in Serial Reader. Another someone in Brazil just downloaded the app for the first time and browsed a few sci-fi stories before settling on War of the Worlds. And just today 6 people read my favorite book My Antonia.

These little micro glimpses into what before was a dull graph showing percentage growth of overall usage is endlessly fascinating to me. Each one is a little story of delight - ok, yes sometimes also frustration - sparked by something I made.

And I find inspiration in thinking up ways to make the app better for that person. How can I make the experience more delightful for that single person, reading an Agatha Christie mystery on the other side of the world?

I have so many ideas.

]]>
Fuzzy Text Search with MongoDB and Python tag:https://mschmitt.org/blog/,2021:fuzzy-search-mongodb-python 2018-02-07T14:42:57Z 2018-02-07T14:42:57Z https://mschmitt.org/blog/fuzzy-search-mongodb-python So you need to add fuzzy search matching to your Python & MongoDB project. Though MongoDB offers quite a few handy text search features out of the box , any search for "Dostoyevsky" requires you spell good ol' Fyodor's name exactly right.

There are likely dozens of solutions to this situation, including switching to another database that supports fuzzy matching. That may be the right answer for you, but for most it's a tall order just to implement one feature.

Here's the solution I use for Serial Reader's search. It may not be the best, but it works well enough.

New search term collection

The goal is to end up with a new database collection, call it search_terms where we can store the keywords we want to search against, the original "clean" keyword, and the ObjectId of the source item.


{
  "keyword": "SEARCH_TERM",
  "original": "Search Term",
  "item": ObjectId("item_id")
}

In this way we can have any number of keywords pointing to any given source item, and we need only index the 'keyword' field for speedy queries.

(I opted to store only the ObjectId of the target object but you could obviously store more data to avoid an additional database hit to get the target object's information.)

Double Metaphone and NYSIIS

To make sure "colour" matches "color" in our search_terms collection, we can use phonetic algorithms to create representations of our search terms that will match a wider net of spellings.

There are many options available, but I've seen the best results using the Double Metaphone and New York State Identification and Intelligence System (NYSIIS), both available in the Fuzzy python package.

Here's our color/colour example...


import fuzzy

dmeta = fuzzy.DMetaphone()
dmeta("color")
>>>> ['KLR', None]
dmeta("colour")
>>>> ['KLR', None]

fuzzy.nysiis("color")
>>>> u'CALAR'
fuzzy.nysiis("colour")
>>>> u'CALAR'

Building the search term collection

We'll run through each search term to create a megaphone and NYSIIS representation of each. Those will serve as the keyword in our terms collection.


for word in terms:
    if len(word) <= 2 or word in stop_words:
        # Skip short words or ignorable words
        continue
    fuzzy_terms = []
    fuzzy_terms.append(dmeta(word)[0]) # doblemetaphone
    fuzzy_terms.append(fuzzy.nysiis(word)) # NYSIIS
    for term in fuzzy_terms:
        search_terms_collection.insert({
            "keyword": term,
            "original": word,
            "item": item["_id"]
        })

Your strategy for determining which words to use as your terms will vary. For Serial Reader, I use book titles, authors, and a group of manually added terms (helpful for getting certain titles to show up for "Sherlock Holmes" queries, for example). I split each term into single words and throw out stop words.

It's also important to consider how to keep this collection maintained going forward. If your list of items is hundreds or thousands long, I've found rebuilding the entire collection via cron job during low usage times takes a few seconds at most.

Searching our fuzzy collection

When a user provides a search query, we transform the words in the query the same way we transformed the original terms.


search_words = search_query.split(" ")
fuzzy_terms = []
for word in search_words:
    if word in stop_words:
        continue 
    fuzzy_terms.append(dmeta(word)[0])
    fuzzy_terms.append(fuzzy.nysiis(word))
results = search_terms_collection.find(
    {"$or": [
        {"keyword": {"$in": fuzzy_terms}},
        {"original": {
            "$regex": search_query, "$options": "i"}}
    ]}
)

Notice I also regex search the original search query against the original keywords to cast an even wider net.

Sorting our results

You may find you need a bit of extra work to bubble the right results to the top. A search for "War Worlds" should return "The War of the Worlds" before "The Lost World" and "War & Peace" to provide the best UX.

I found a good way to achieve this is to use the Levenshtein python module to calculate distance values between the user's search query and the results' original keywords.

We can find the best (lowest) distance for each returned item. I build a map of these values to append to the original items fetched from the database, allowing me to sort the whole list by ascending distance.


result_map = {}
for result in results:
    result_item = str(result["item"])
    keyword_distance = float(
        distance(search_phrase, result['original']
    )
    if not result_map.has_key(result_item):
        result_map[result_item] = keyword_distance
    else:
        result_map[result_item] = min(
            keyword_distance, result_map[result_item]
        )

Sorting by this distance value allows you to further weight the value by other important stats, like popularity or relevance to the particular user.

And that's it! You can try out the search feature in Serial Reader to see how this approach performs.

I've found building your own fuzzy search collection this way allows an enjoyable amount of control over what terms are searchable and how order results are returned.

]]>
Reaching nearly 200 reviews in 8 days with SKStoreReviewController tag:https://mschmitt.org/blog/,2021:using-apples-new-skstorereviewcontroller 2017-06-06T21:52:27Z 2017-06-06T21:52:27Z https://mschmitt.org/blog/using-apples-new-skstorereviewcontroller 06/23/2017 Update - Three weeks from launch and the U.S. ratings count has exceeded 300, far beyond what I've seen in the past for a single release. (Interestingly of those ratings, only 5 reviews have been posted. The majority of those are positive and elaborate, but an interesting ratio nonetheless.) In any case, I strongly recommend adding SKStoreReviewController support to your iOS app!

After a several month lapse - due to moving, getting married, a computer dying... excuses, excuses - I finally returned to development of Serial Reader with a minor update to the iOS app.

Along with some minor bug fixes and performance tweaks, the only major change was support for Apple's new official review prompt. The results have been dramatic.

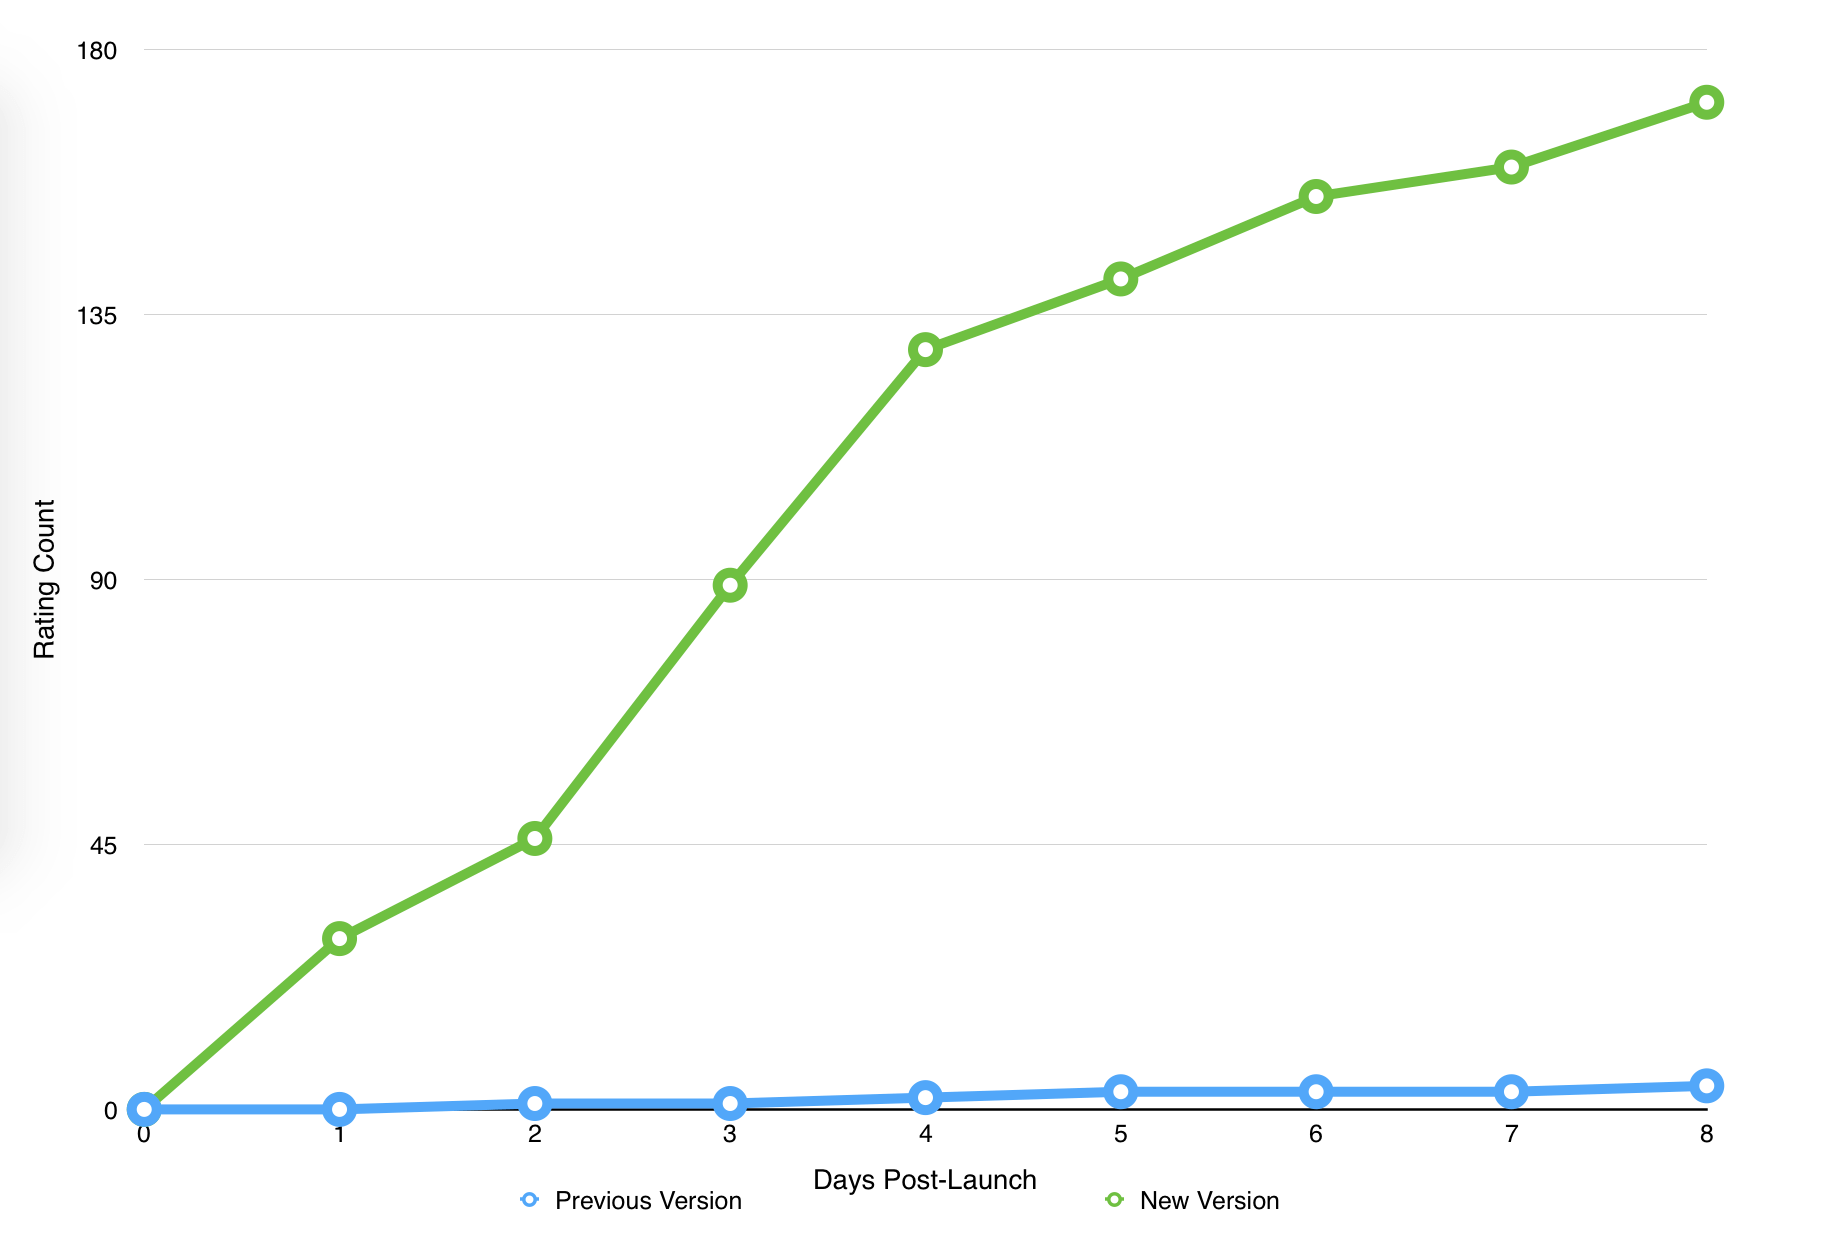
Serial Reader review count

Adding support for SKStoreReviewController was painless. Because Apple handles all of the logic on when and how often to show the user a prompt, all that's left for you as a developer is to determine where and when "it makes sense to ask the user for ratings and review within your app," as Apple states.

In my case, I decided to only prompt the user when he or she had used the app on at least 5 separate occasions (achieved by just adding a little counter in NSUserDefaults).


NSUserDefaults *defaults = [NSUserDefaults standardUserDefaults];
NSInteger visits = [defaults integerForKey:@"user_visits"];
if (visits >= 5) {
    [SKStoreReviewController requestReview];
}

That's it!

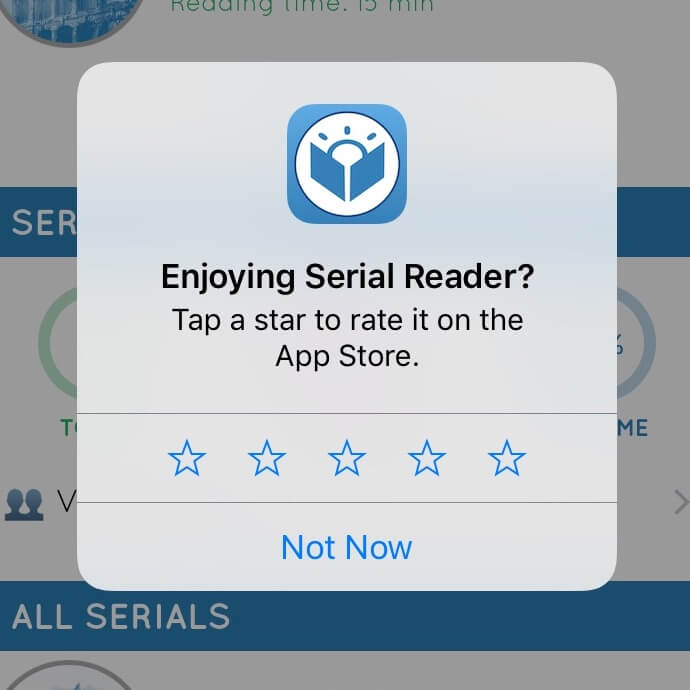
Serial Reader review prompt

The update was released on May 29, 2017. Each day after I tracked the number of ratings it received. By day 1 I had exceeded the number of ratings the previous version had received over the course of months. After 8 days, Serial Reader had collected nearly 200 new ratings.

It will be interesting to see what happens with future releases. I don't know the specifics on how Apple is determining when to show these prompts to users. If it really only is a few times a year, this may be a first-time trend that's never again replicated.

]]>
Dynamically update Django form choice labels tag:https://mschmitt.org/blog/,2021:dynamic-django-form-choice-labels 2017-06-05T02:48:23Z 2017-06-05T02:48:23Z https://mschmitt.org/blog/dynamic-django-form-choice-labels Let's say you have a form with a ChoiceField populated with preset options, but you want to make the choices more specific to the user.

For example, you want to ask the user to select if they like their favorite book or their favorite movie more. Let's say for some users, you already know their favorite book and for those users you want to display the book's title instead of a generic "Your favorite book" label.

I had trouble initially finding a solution for this situation, so thought I would share what I ended up doing.

In your form's class method, override the __init__ method with an additional optional argument specifying the favorite book...


class FavoriteThingForm(forms.Form):

    favorite_book_label = 'Your favorite book'
    favorite_movie_label = 'Your favorite movie'
    favorite_choices = [
        ('book', favorite_book_label),
        ('movie', favorite_movie_label)
    ]
    
    favorite_thing_choice = forms.ChoiceField(
        label=('What do you like more?'),
        choices=favorite_choices,
        widget=forms.RadioSelect
    )

    def __init__(self, favorite_book=None, *args, **kwargs):
        super(ExampleForm, self).__init__(*args, **kwargs)
        if favorite_book:
            # Overwrite labels
            self.fields['favorite_thing_choice'].choices = [
                ('book', favorite_book),
                ('movie', self.favorite_movie_label)
            ] 

And then in your view, pass the user's favorite book - if it exists - to the form using get_form_kwargs...


class FavoriteSelectionView(FormView):
    form_class = FavoriteThingForm
    
    def get_form_kwargs(self):
        kwargs = super(FavoriteSelectionView, self).get_form_kwargs()
        if user.favorite_book:
            kwargs['favorite_book'] = user.favorite_book
        return kwargs

And that's it. Now users with a favorite book will see it listed as a choice, while others will see the generic "Your favorite book" option.

]]>